DISCLAIMER: Unless otherwise noted, service information has been provided by an edition of the Mechanical Procedures Manual, Body Manual, and the Hudson Owner Manual for Jet models. The data from the Manuals includes information covering specifications, adjustments and detailed operation involved in maintenance and repair procedures. After market updates from Hudson Service Merchandisers and other sources have been added as well and are credited in italics. HudsonJet.net provides this reference as a courtesy and is not responsible for any work done using Hudson Motor Car Company's publications or other sources provided on this site.
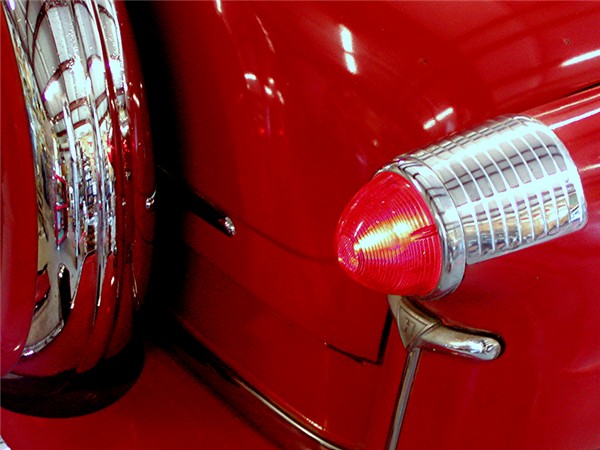
Hand Buffed Genuine Leather supplied on Seat Cushions and Seat Back Cushions. Imitation leather used for Headlining and Side Walls including Door Panes. Available in six colors on All Models.
Option Letter AA-2 AA-3 AA-4 AA-5 AA-6 AA-7
Option Name Hand Buffed Genuine Leather Trim Hand Buffed Genuine Leather Trim Hand Buffed Genuine Leather Trim Hand Buffed Genuine Leather Trim Hand Buffed Genuine Leather Trim Hand Buffed Genuine Leather Trim
Color Scheme Blue & Gray Maroon & Gray Green & Gray Solid Blue Solid Maroon Solid Green
[1954 HUDSON "D" SERIES MODELS] as suggested in Hudson Service Merchandiser Vol. 5, No. 11, November 1953
[A Preliminary 1954 Parts Catalog was distributed. It listed the new and non-interchangeable parts for "D" Series Models. The Preliminary 1954 Catalog included all of the parts information that had not been included in previous Catalogs, but which were necessary to service the New "D" Series. It was intended that the Preliminary Catalog be used with the 1953 Catalog. As a general rule if the part was not listed in the Preliminary, it was the same as the part used in "C" Series.]
Starting with the "D" Series, the trim style of each car is identified by a number. This trim code numbered is etched on the serial number and name plate which is attached to the right front door pillar.
A Trim Code and Upholstery Chart is published in the Preliminary 1954 Catalog, and in its Trim Supplement. After obtaining the trim number and the car number, it is now possible for a Dealer to order upholstery materials as may be necessary to repair a damaged trim assembly.
The parts numbers listed in the Chart are for bulk trim materials, not fabricated assemblies. Most upholstery cloths and imitations are 54" wide, although a few may be as much as 62" wide. Prices of these are based on the lineal yard. Genuine leather is priced by the square foot.
The Preliminary Catalog Trim Supplement lists trimmed assemblies, such as seat cushions, which have been catalogued before. It also furnishes, for the first time, new trim sections in Group TT. This group lists headlining, trim panel and seat upholstery assemblies.
Dealers may now price and order 1954 trim and upholstery. They can also place accurate orders for cars prior to "D" Series. All trim or upholstery orders must include the car number, a description of the parts, and with "D" Series Models, the part number and trim number.
What's commonly known as windlace, is also known as wind cord. It must be in place prior to the installation of a headliner. If you only want to replace a headliner, it can be done by keeping the existing windlace in place. However, I would suggest replacing the windlace at the same time as the headliner. Pre-sewn windlace is available at any upholstery warehouse and online upholstery site, most often covered in cloth. I personally chose to do vinyl to match my interior, which required me to sew it myself. Simply purchase about 15 yards (45 feet) of 1/2" rubber cord from your local upholstery shop. It may be black as seen in photo, but is also commonly found in off-white.
The first photo shows that I chose to cut 3-1/2" strips using a cutting method not often used by auto trimmers. My background in quilting leads me to use a self-healing cutting mat and rotary cutter to aid in straight, quick cutting. The front doors require approximately an 11 foot strip.
Although a commercial sewing machine is advisable for all upholstery work, one can get by with a standard sewing machine when stiching up windlace. The second photo shows that a standard machine will need to have the zipper foot placed on it. The material needs to come across the working area at an angle and be pulled by the left hand to assist in feeding and even stitches. With a 3-1/2" strip, I allow 1/2" between the edges of the material. It may be easier to cut a 4" strip and simply align the edges, but I chose not to in order to prevent bulkiness. Having about a 1 inch tab along the windlace should give enough surface area for gluing, but also allows the retaining clips to assist in holding windlace in place. This can be seen in third photo. A spray adhesive glue will work, but caution needs to be taken so that overspray doesn't occur.
I recommend visiting the following links showing thorough installation guideline for a Studebaker.
The "headliner" is located above your head as you're sitting inside the car. The headliner's function is to mask the underside of the car's metal roof and to reduce noise while driving.
There are two kinds of headliners - "bow" headliners and "board" headliners. Bow headliners are cloth or vinyl sections sewn together and suspended from metal rods (bows) that cross the underside of the roof. You have a bow headliner if you see seams running from side to side across the headliner every foot or so. Bow headliners were commonly used in cars into the mid-1970s when manufacturers began to switch over to board headliner systems, which are moulded, snap-in kits.
A general rule is that the older the vehicle, the harder it is to replace the headliner. The Jet obviously predates the ease of running to the auto supplier for a replacement kit, but pre-made headliners are available from a few select companies. See Replacement Parts List at the bottom of this page.
REMOVAL
Inspect headliner closely and make careful observations during the removal process. Create a journal entry describing how the mouldings and trim were disassembled. Make a sketch or take a picture before and during removal to be used as a reference later. Take note of the rubber grommets as you remove the bows from their slots, these fasteners will need to be replaced, as well as marking bow locations. When you do the new installation, having taken careful notes, you are simply reversing steps.
Remove the sun visors, the antenna knob and knob escutcheons, the rear view mirror, the right and left windshield garnish mouldings, the dome lamp glass and bezel assemblies (snap-in type). It is advisable to disconnect the battery to reduce drain to dome light and other accessories.
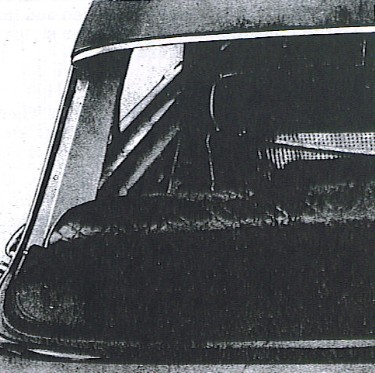
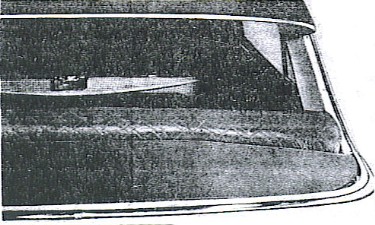
Remove the upholsterer's tacks from around the rear window opening as shown in Figures 73 and 75, pull headlining loose from cement.
Remove headlining from glazier's points at upper windshield opening and pull headlining from cement.
Use a screw driver to pry open these glazier's points to facilitate installation of a new headlining
Use a narrow blade putty knife and working through the opening between the windlace panel and roof header unhook the headlining cloth from the glazier's points until complete headlining is removed or as required.
NOTE: If the complete headlining is to be removed and replaced with a new headlining, slit the headlining along the retainers on both sides of body, snap out roof bows and remove headlining. Loosen retainer screws and remove the scrap material from the glazier's points. Retighten retainer screws securely.However, cautious removal of the headliner will preserve the pattern for later use.
FIGURE 73
INSTALLATION
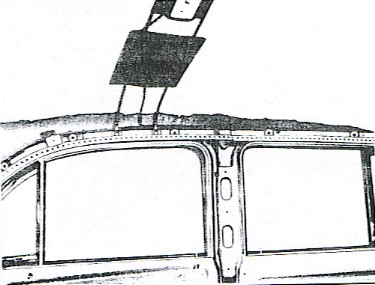
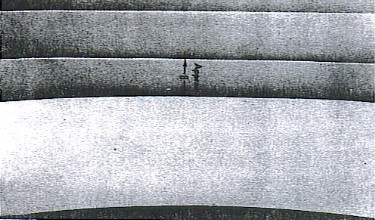
NOTE: Before replacing headlining make sure roof panel insulation is securely glued and in the proper position and the retainer strips are aligned as shown in Figure 74. Insulation may sag over time. If sagging insulation is in good condition it may be reglued. If it is rusted or stained, replace the insulation. Replacing insulation requires removal of the dome light bows which may have screw-in ends as opposed to the snap-in bows of the headliner. It's advisable to upgrade to a 1/4" sound-deadening insulator, a far improvement from the fiberglass insulation from the factory. Also, it may be helpful to mark the back of the headliner with a chalk centreline to help while fitting it and trial fit the headliner to ensure all bows are in the proper position.
Apply trim cement [or slower setting neoprene glue] at flange of rear window opening and at windshield opening. Allow cement to become tacky before installing new headlining.
FIGURE 74
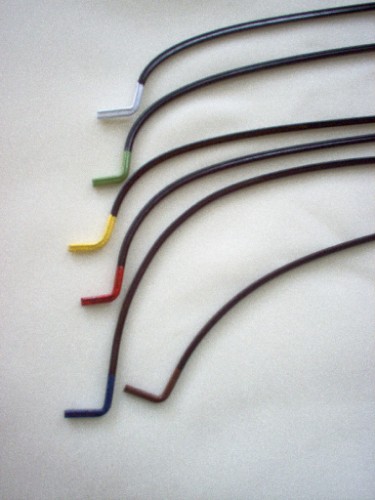
NOTE: Remove roof bows from the old headlining and install them in the new headlining. [Your headliner had looped pockets, or "listings," across its width. In each listing there should be a metal rod (bow) inserted through it.] The correct placement of the roof bows in the headlining is very important. The following roof bow color guide will assist you to place the bows in their proper sequence. One end of the bow is painted as follows:
Extra Practice Project: Build a small box and attach some headliner material with wrinkles. Use the hair dryer and water spray bottle to practise removing wrinkles.
No. 1 Roof Bow - White
No. 2 Roof Bow - Light Green
No. 3 Roof Bow - Yellow
No. 4 Roof Bow - Light Red
No. 5 Roof Bow - Dark Blue
No. 6 Roof Bow - Dark Brown
Starting at the rear of body roof panel, hook in each end of the roof bow into the roof bow anchor bracket and snap into position. [There should be a black rubber grommet within the bracket to ensure snug fit.]
Install the remaining bows in their proper sequence, spacing the headlining evenly between each bow.
NOTE: Hook number one bow in the roof bow bracket, but do not snap into position at this time.
Glue the , pulling tightly to remove wrinkles.
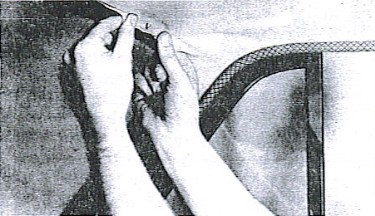
Stretch headlining down and press into cement around rear window opening, starting at back center and then work outwards to the corners. To avoid wrinkles and pleats in the material at corners, cut several radial slits about 1-1/2" apart and 3/4" deep. Work material around the flange of the rear window opening and tack in place with upholsterer's tacks, Figure 75. [A tack hammer or staple gun work as well. Office binder clips can also be used in a pinch.]
ROOF BOWS
Webmaster's Note: It is advisable to take a square of sandpaper and lightly sand rust and debris (such as rotted fabric) from the roof bows. Follow that by spraying them with a rust encapsulator such as Rustoleum or Hammerite. Failure to clean the bows if dirty or rusty may cause staining to come through the new headliner. I took my bows a step further by re-painting the tips using acrylic paint found in any craft store and protecting the color by spraying a clear gloss polyeurthane spray.
NOTE: The first seam at rear of headlining should be approximately six inches from inside edge of roof panel to rear window flange as shown in Figure 76.
Stretch headlining and force it under the metal retaining strip, using Tool J-2772, starting at the rear on both sides and working to the front.
Snap front roof bow in position, stretching the headlining over the windshield header glazier's points and cement headlining to the inside flange of windshield, as shown in Figure 77.
With windcord in position at front pillar posts, securely hook headlining to the glazier's points. [Finishing lace is simply cemented into place.]
Install windshield garnish mouldings, see "Garnish Moulding Installations", rear view mirror, sunvisors and antenna knob and escutcheon. Use a scratch awl to puncture headliner for screw holes as necessary.
Carefully cut the headlining at the dome light and install the dome light lens and bezel assemblies.
HINT: Most minor wrinkles can be removed with steam. Use a water spray bottle in one hand and a hair dryer in the other hand. Move slowly, using as little moisture as possible, as too much water or heat can do permanent damage. Do a practice project before attempting full job.
From behind the instrument panel at the top loosen the five nuts sufficiently (do not remove) to allow instrument finish panel to be pulled forward to remove the panel top covering.
Remove the two side screws attaching the instrument finish panel to the instrument panel.
Pull covering loose by working from windshield towards instrument finish panel.
INSTALLATION
Clean top of instrument panel thoroughly to insure an even surface.
Apply a light coat of trim cement direct to the covering.
Carefully install the covering to the instrument panel allowing 1/2" of fabric to overlap the instrument panel at finish panel. Where the five studs attached to the instrument finish panel enter into the instrument support panel, cut 1/4" slots in the covering to allow the material to go between the instrument finish panel and the instrument panel. With a blunt putty knife, start from center and work towards both ends of instrument panel. Trim around end corners and tuck ends in at each end of instrument panel. Work from instrument finish panel towards grille and windshield working out all bumps and wrinkles in fabric.
NOTE: Do not cover defroster outlets at windshield; cut and trim as required for radio speaker and defroster outlets.
Install garnish mouldings, rear view mirror, radio speaker grille.
Replace the two side instrument finish panel screws and retighten the five nuts behind the instrument panel.
Further details are in the works. Check back for more information!
REMOVAL
Inspect the door panels. Examine the door panel to be recovered and determine if it can simply be repaired or if replacement is necessary.
Determine the best way to remove the panel from the door. A service manual for the vehicle can be helpful. A thin tool may be required to depress the holding tabs or buttons behind a panel. Remove the hardware and arm rest from the panel.
INSTALLATION
Measure and lay out the fabric to be cut. Do not remove the previous fabric. Make sure that the replacement fabric is at least 125mm (5 inches) larger than the door panel. Mark the location for each piece of hardware.
Reinstall the door panel by aligning the tabs or buttons and reinstalling. The hardware will hold the door panel tightly to the door.
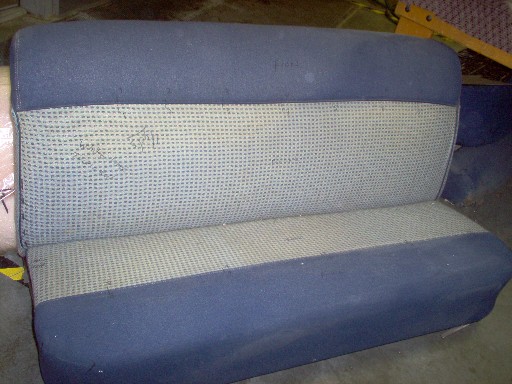
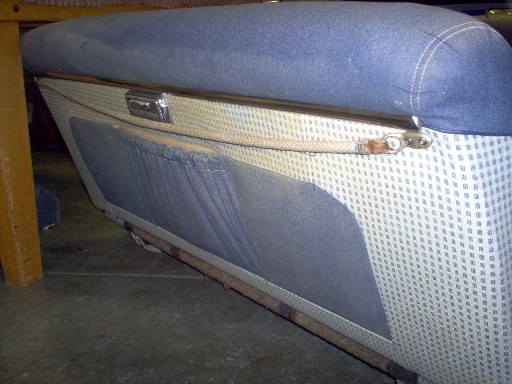
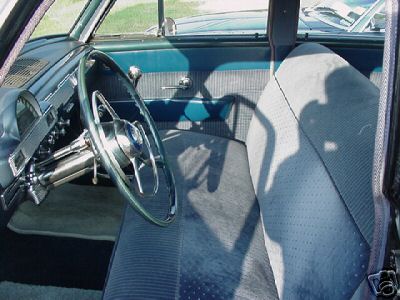
Above is one example of original seat fabric. Although it may be difficult to see, I've put some fitting marks on the seats and made marks to see where the tuck 'n roll lines should fall on the finished product.
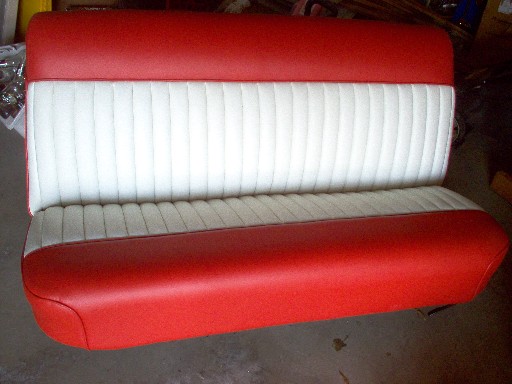
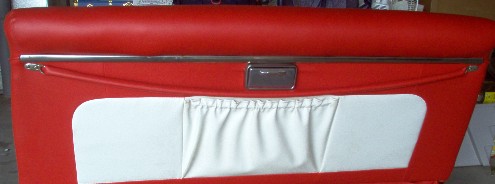
I decided to go with vinyl from Keyston Brothers' Partners line. I went with the very distinctive Torchfire Red and Snowstorm White. These colors pair well with the exterior colors, Viper Red and Viper Bright White, selected from the 2004 DaimlerChrysler Chart. The front seat took much more effort and time than the back seats. The bottom portion of the front seat required new foam rubber. The old cushioning literally crumbled when I peeled off the original fabric. I also took some Black Gloss Hammerite and touched up the feet and handle for the seat adjustment. The rear pocket was fun as well as interesting. I was reminded of the age of these seats when I realized that the pocket had a spring rather than elastic for flexibility. I am THRILLED at how well the tuck 'n roll turned out on the seats.
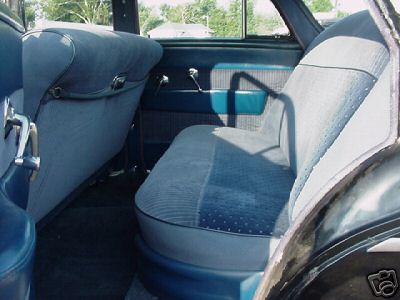
Below is an example of a more conservative interior. It echos the blue of the past in a contempory velour.
Helpful guidelines for any vehicle interior...
Objective
Notes
Bench Seats
To inspect the bench seat.
Inspect the seat for potential hazards. Carefully note the location of electrical wiring and the forward and rear seat adjustments.
To detach the bench seat from the vehicle.
Exercise caution with the electrical wiring. Replace the bolts. A journal entry describing the electrical hook-up and other special notes is important.
To disassemble the bench seat.
Create a journal entry on how the seat is disassembled.
To strip the seat.
Remove the material from the seat frame. Inspect the cushioning and repair it if necessary. Ensure the springs and foam are in good repair. If not, repair them at this time.
To create a pattern from original seat covers.
Turn the seat cover inside out and label each piece prior to seam ripping. Carefully disassemble, as the pieces will be used for the pattern layout.
To layout, mark, cut, and sew new fabric.
Ensure that the material is cut exactly as per the pattern.
Note that some pattern material may stretch. Ensure the material is laid out and traced with chalk or tailor's marker that will not stain the fabric.
To reattach the seat cover.
Make sure electrical wiring and the movement mechanisms are in place.
To reattach the seat back.
Plastic may be required to cover the foam. It may be necessary to heat vinyl to slip it on the frame. Silicone lubricant will ensure that the seat cover will slip onto the frame. Silicone lubricant can be used on either vinyl or cloth.
To hog ring the seat.
Reattach the seat to the frame. Ensure electrical wiring is reconnected at this time.
To reassemble the back and the seat.
Cut and trim the material to allow reassembly. Some bolts may have to go through the material to attach the back, especially if from a two-door vehicle (two seat) where the seats must hinge forward to allow access to the rear seat.